
Bethesda hasn’t changed its ways of offering numerous side quests to keep you busy. Most of these quests are so interesting that players often forget about completing the main quests, thus increasing the time to complete Starfield. However, we strongly suggest that you should maintain a balance between optional and important quests to maximize your fun time. Among these quests, Into the Unknown seems to pop up quite a few times in internet searches.
Although this quest isn’t as complex as what is about to come next. Still, players have been trying to complete it for several days now. Another reason is that this quest has several bugs that can prevent you from even starting the quest. Therefore, this article provides the complete Into the Unknown quest walkthrough and suggests solutions to potential bugs.
Table of Contents
Into the Unknown Starfield Walkthrough:
Like other main story quests in Starfield, Into the Unknown will pop up in your journal after you complete its preceding quest. In this case, you must complete Back to Vectera and The Old Neighborhood quests to unlock this mission. Once you see it in your journal, head to The Eye and speak with Vladimir to see your objectives.
Potential Into The Unknown Bug:
For some players, the quest doesn’t pop up in the journal for some reason. Usually, the main reason is that you must be missing out on some prerequisites. So, first, ensure you have completed all available quests, including the ones mentioned and The Empty Nest.
If the quest doesn’t show up even after completing those quests, you have a glitchy copy of the game. Now, there are two ways to fix this issue:
- PC Version: You can fix this bug either by skipping ahead using console commands or you can try updating the game to the latest patch.
- To skip the quest, open the command console with ~ and type the following command:
setstage 000160A9 600
- Once you enter this workaround, you must use Nexus mods to unlock achievements.
- To skip the quest, open the command console with ~ and type the following command:
- Xbox Version: Unfortunately, Xbox players can’t access the console command menu. So, you should update the game to the latest patch, as the issue has now been resolved.

Now that you have unlocked the quest in your journal, the next step is to visit The Eye. Here is a step-by-step walkthrough of Into the Unknown quest:
Talk to Vladimir:
To start the Into the Unknown quest, you must find and speak with Vladimir. He resides in a space station known as The Eye. This station orbits around Jemison in the Alpha Centauri star system. If you have previously explored this location, you can set a course to it directly from your map.

Next, dock with The Eye after you reach 500m from the station. Once docked, enter the structure and find the Scanning Control room in the north. Before you go there, be sure to explore around to find a bunch of first aid kits, Alex Hay’s Note, ammo, and Peak Performance 01.
Finally, head inside the Scanning Control room and speak with Vladimir. He will reveal the location of two known artifacts and ask you to find the missing Constellation member Andreja.
The planet locations are randomized, depending on your progress and playthrough decisions. So, we won’t reveal the names of these planets and just call them the first and second planets.
The First Planet:
No matter which planets you get assigned, the general walkthrough remains the same. For the first planet, follow the marker and take out your scanner to find a suitable landing site. Once landed, follow the scanner to an abandoned mine.
Make sure that you have at least character level 10 and suitable gear for a deadly fight. Next, head inside the mine and find Andreja, who just recently killed an assailant. From here on, Andreja will accompany you for the rest of the quest.

After interacting with Andreja, descend further into the mine until you find a computer. Use the computer to unlock a robotic companion and change the settings for Friends/Foes. This way, the robot will assist you in defeating all Va’arun lunatics.
Finally, descend deep into the mine while killing the remaining foes until you find the artifact. If you get lost down there, take out your scanner to reveal the way. Once you find the artifact, use your cutter to retrieve it from the debris.
The Second Planet:

After retrieving the first artifact, your job is to visit the second planet. Again, this planet is completely randomized, so head to the marker. Before you land on the planet, take out your scanner and look for an abandoned outpost. This second artifact won’t bother you as there aren’t any enemies in the area.
Once inside the cave, use your scanner to find the artifact. Finally, use the laser cutter to clear the debris and retrieve the second artifact.
Potential Bug:
Some players have reported that they can’t find the planet as it doesn’t appear on the menu. Fortunately, you can solve this issue by fast traveling to a distant location and waiting for 24 to 48 hours. When the wait is over, the two planets will show up on your star map.
Return to The Lodge:

Now that you have retrieved both artifacts and saved the lost Constellation member, your objectives are pretty much complete. Simply head to The Lodge in New Atlantis and place the artifacts in their respective pedestals.
After placing the artifacts, speak with Matteo, who asks you if you believe in dreams or science. If your answer is dreams, you will gain respect among the Constellation members. Similarly, if you choose science, you will gain respect from Matteo. Finally, if you choose neither, you won’t gain any respect or XP.
Potential Bug:
Some players can’t enter The Lodge for some reason. The easiest way to fix this bug is to avoid landing near The Lodge. Also, avoid completing the Crimson Fleet questline before starting this quest. Alternatively, you can also fix it by traveling to another galaxy, waiting for 24 hours, and returning back to New Atlantis.
Report to Vladimir:

After placing the artifacts, Vladimir will ask you to speak with him aboard The Eye. Simply fast travel to the location and speak with Vladimir in the same place as before. It may seem that the quest is done, but it is far from over.
Vladimir says that he has detected some anomaly in the scanner and asks you to investigate the source. Again, he will suggest the location of another random planet and ask you to check it out.
Visit the Final Planet:

Make sure to recruit Sarah as your companion, as it will prevent a few bugs. Next, head to the marked planet either with Grav Jumps on your best ship or by fast-travel menu. As you approach the planet’s orbit, bring out your scanner and look for the Temple site.
Next, land near the Temple, take out your hand scanner, and follow the circular distortions. The anomaly will get stronger as you get closer to the source. Once you enter the Temple, take out any nearby enemies and make your way deeper into the structure.
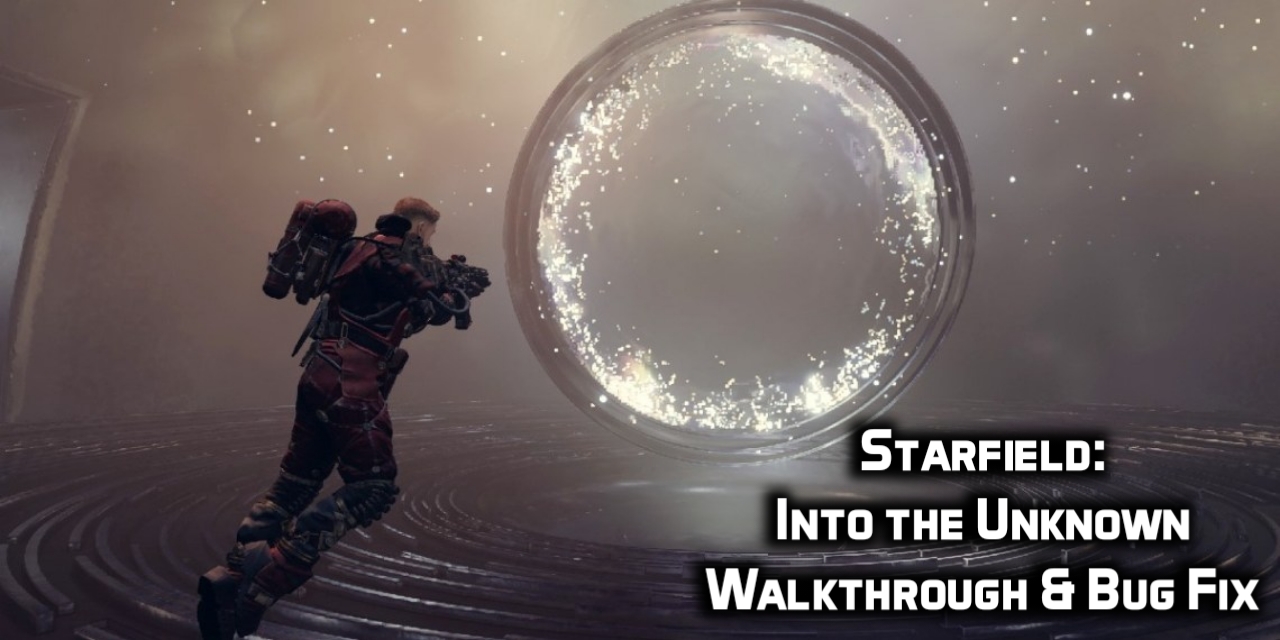
The Gravity Puzzle:

As you head inside the main structure, you will find a bunch of rings. These rings will rotate and cast light in different locations. To solve The Ring puzzle, use your Boost Pack and follow the lights. The rings will start spinning faster as you get closer to your goal.
Finally, when the rings have stopped moving, you will find a portal inside these rings. Enter the portal to see the last vision of this quest and end up outside the Temple. This way, the anomaly or distortion will stop, and you can now use the Anti-Gravity power.
Collect your Rewards:

After solving the anomaly problem, head back to The Lodge in New Atlantis. Show your new Anti-Gravity power to the Constellation members. Speak with Vladimir, show him your power, and again interact with him to finish Into the Unknown quest.
You will receive the following rewards for this quest:
- 11000 Credits
- 450 XP
This quest is perhaps the most rewarding in terms of potential gains. Not only will you receive a huge chunk of XP, but you will also unlock one of the best (and beautiful) companions. Also, it is perhaps the best main quest to make money in Starfield.
How to Fix Into The Unknown Bug on Xbox?
If you can’t find a way to fix the quest not showing up bug in Xbox and don’t want to update the game, there’s another workaround for you. However, you must enable cloud saving for this method to work. Also, it will disable your achievements, and you can’t unlock them without mods.
To fix this bug, use the GeForce Now PC service to stream the game on any PC, Laptop, or Phone. Next, wait in the queue and launch the game with your previously saved files. Finally, use the Console Command “setstage 000160A9 600” to skip the quest and unlock the next main story quest.
Even though this workaround is great, it may cause errors and glitches in other games. Also, losing your achievements just because you don’t want to update isn’t worth it. Therefore, we strongly recommend that you should update Starfield to the latest patch to solve several bugs.
Conclusion:
Starfield offers numerous side quests and optional missions, along with 18 main quests to keep you busy for several hours. However, some main quests can be a bit mind-boggling, especially if bugs are attached to them. In this regard, the Into The Unknown quest is among the toughest ones to crack. Therefore, this article provides a complete Into the Unknown walkthrough and explains possible fixes for various bugs along the way.


